
And three months later, I'm finally going to add my part of the costume construction... Thank you Tiffy for being so prompt and responsible about this! And... I'm going to have way too many pictures, sorry.
Costume Construction
Christine -- Serah Farron from FFXIII (Day 1) and FFXIII-2 DLC (Day 2)
Tiffany -- Lightning/Claire Farron from FFXIII (Day 1) and FF Dissidia DLC (Day 2)
debuted AX 2012
Lightning
So, every year, christine and i decide on new set of costumes for the next convention and every year, my procrastination has gotten worse. All the planning and fabric gathering over the last year is kind of useless if you don't give yourself enough time to actually make the costume. 2 weeks of 15hr sweatshop days was awful...and i didn't even get to make the sword! well, you can see for yourself how it turned out XD
Time for construction: 2-3 weeks
Cost: $100 (including wig and contacts)
Wig: The wig I bought pre-styled from an online retailer on ebay. The wig was decently priced, but the shipping was a little expensive (~$12). The wig quality was pretty good -- there were a decent amount of fibers and i had very little shedding. I loved the color -- light pinkish purple with hints of gray. Since I didn't have to go through the hassle of wig coloring and styling, i say it was pretty worth it.
Contacts: I bought the contacts from pinkyparadise.com :D i like the website -- contacts are easy to order and they have contacts in really terrible prescriptions :P the color is geo nudy blue, which shows up as a dark gray blue on my eyes. not super vibrant, but you can tell that they're blue and i like that they kind of look natural on me. the only con is that you should give more than a month for shipping, since the contacts come from malaysia.

Turtleneck: I bought brown ribbed stretch fabric and 14in silver zipper from joann's. i based the turtle neck design off of my tifa vest pattern from last year and sewed the collar on separately.
Corset thing: wrote about this earlier, but i used dark blue jean fabric with silver grommets and leather twine. went with blue because that's what i perceived it to be and want to tie in the color of her gloves. artistic license :P

Vest: the vest was one of the most time-consuming and difficult parts about the costume. although the vest itself is pretty simple, it just has a crazy amount buckles and random things attached it, which makes it difficult if you want to line it (which i ended up not doing unfortunately). again, i used the tifa vest pattern i made last year and made it longer with a tapered waist and wider shoulders. the collar i make separately. i used a heavyweight white cotton for the outside vest and lightweight beige/tan cotton for the inside. I used silver grommets as the rings on her pockets and silver-painted craft foam as the million buckles on the vest. The buttons on the front corners of her jacket were black buttons that i painted to be the right color.

Metal buckles: the metal buckles on the front of the vest were bought from lemonbrat.com and cost about ~$25 (small buckles + shipping + tax). random online forums suggested a metal buckle retailer (i forget the name) but they didn't have an adequate online purchasing system and i wasn't sure if i had to buy in large quantities. i attached the metal buckles with silver rivets from joann's. the accompanying buckle was attached with rivets and painted leather/vinyl. the buttons in the front

Cape: The cape was a lightweight cotton in a maroon color. I attached the cape physically to the leather piece with silver rivets and gorilla glue and make the leather piece detachable on the vest with velcro. I forgot about the giant button for the cape part, so i just attached a circular piece of leather (ghetto...)

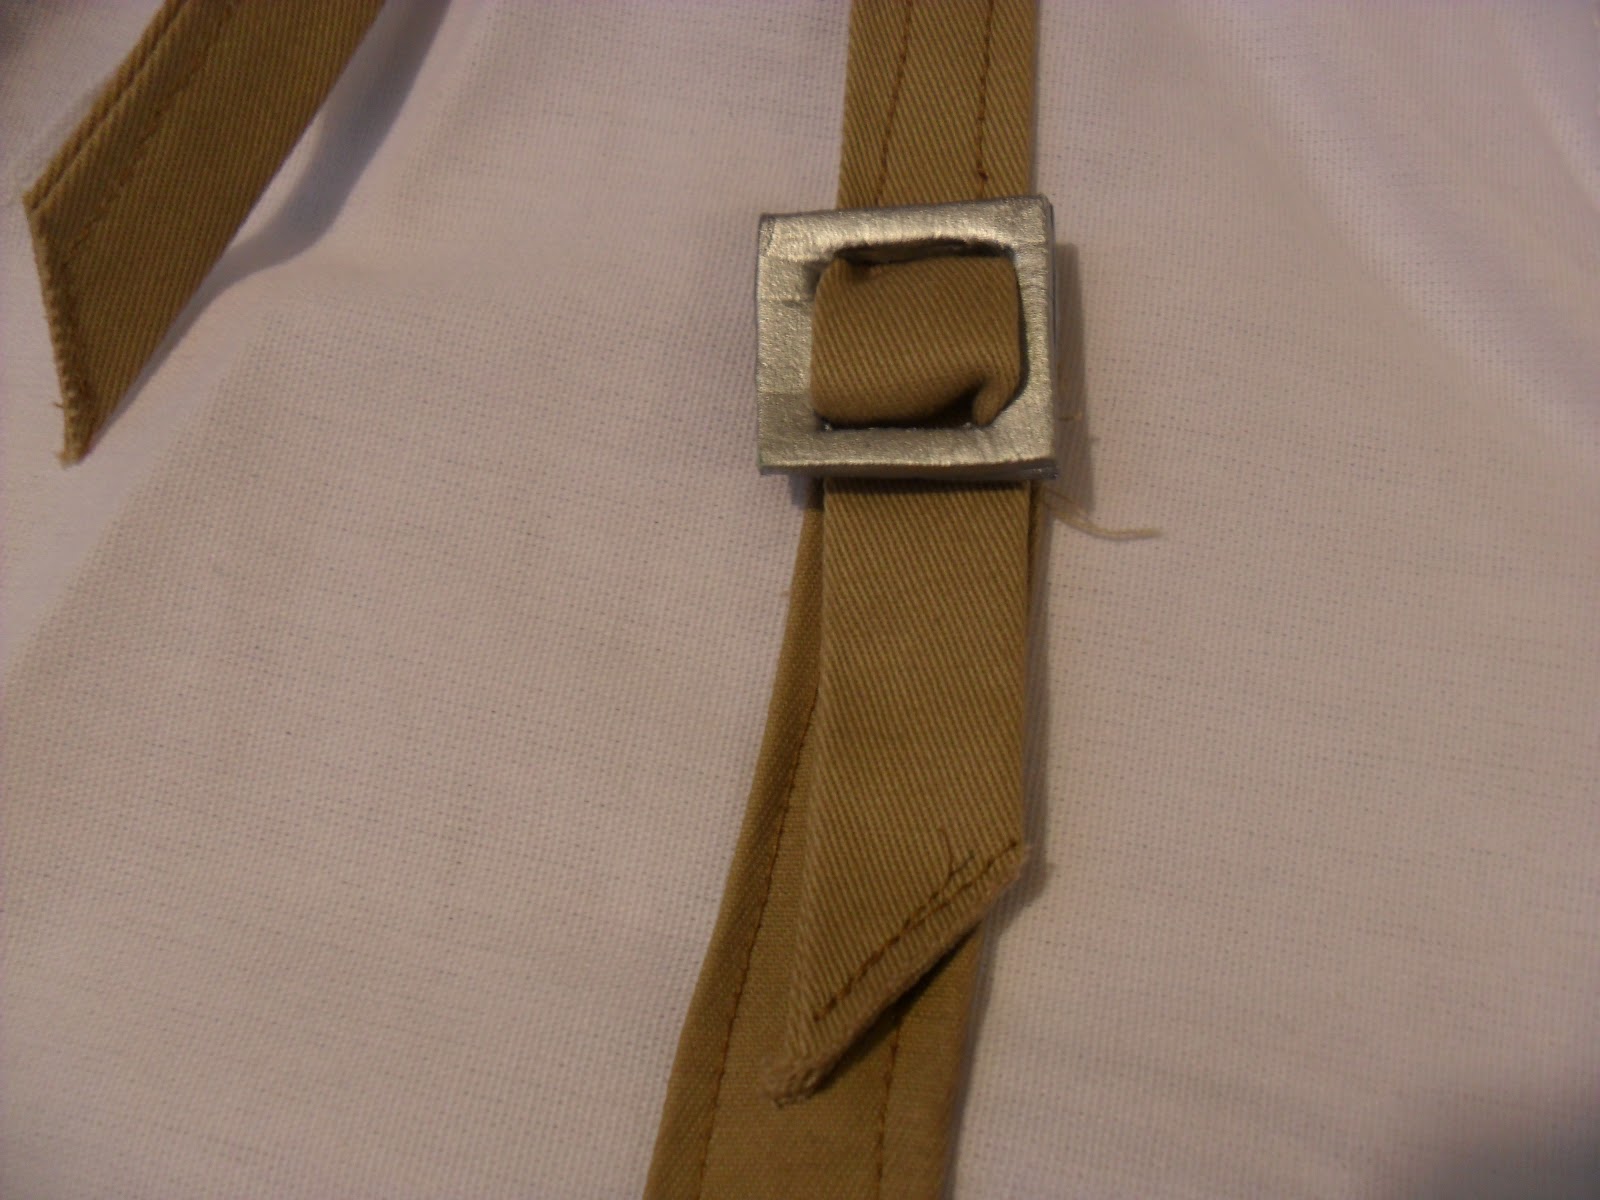
Belt: I made her belt with a leather/vinyl that i painted in the right color. the belt buckle i obtained from an old top that i found in my closet and painted silver (originally black suede). i tried finding a buckle that large in stores but couldn't and initially tried to make a craft foam one (doesn't work)

Armbands: The two armbands were both made from leather/vinyl that i painted and secure with velcro. the crisscrossing band was made following a tutorial that christine previously cited which involved crisscrossing small strips of fabric. i glued all my pieces together since lightning's doesn't seem to have stitches but that was a fail later at the con, since it didn't hold up to all the movement and flexing. i added silver cover buttons instead of rivets. for the second armband, i glued two small strips onto a larger strip of leather vinyl to create a "depth" look. i hand sewed the arrow patterns with white thread.

Shoulder armor: For the shoulder armor, I cut craft foam into the shape of a circle large enough to fit my shoulder around and creased one side to give it a 3D shape. I sewed the crease together and glue a triangle shape on top and smoothed out the edge with clay. For the bottom flap, i cut out 3 separate pieces of craft foam to give the illusion of carving and glued them together. painted the entire thing with green/black/silver acrylic paint and added the gold and silver craft foam pieces on top. spray painted with gloss to seal in the color. i added leather strips with silver cover buttons that i pressed and glued into the foam. the armor attached to my vest via velcro.
Arm sleeve/gloves: the arm sleeve i made from stretch black yoga pant material that i shaped into a tight sleeve. no need for elastic at all. since the gloves for christine's second costume was the same as lightning's and we were both frustrated at making gloves, she bought vintage blue leather gloves which we altered to fit both our hands. the gold pieces on top were made with index cards, straws and gold acrylic paint. the silver band was made with silver-painted craft foam held together by white elastic so it could stretch over our hands.

Leg bag: this item was the thing i was most proud of accomplishing and then it became the bane of my existence at the con. I made it from red home-decor leather fabric so it had a thick fuzzy white layer on the underside. i made up my own pattern and sewed every piece on individually until i had a bag, which is why some parts are slightly crooked. the bag is fully functional ( i kept all my stuff in it at the con) but i slacked on the straps by putting it together with velcro. it kept falling off so i ended up just safety pinning it around my leg. silver-painted craft foam buckle and rivets on the straps. definitely will make this again for my own satisfaction.


Boots: OMG this took me 2.5 entire days to make and all of it by hand. since i'm so short, i invested in a pair of platform boots that i could use for all my cosplays. they cost about ~$45 and i purchased them from rivithead.com. i essentially used the boots as a model as i draped the pieces of leather/vinyl around and sewed together. the cover slips onto the boot and is secured by an invisible zipper in the back/elastic bands on the bottom to get the boot shape. the silver belt pieces are painted leather vinyl and buckles are vest buckles from joanns.
GAH and that's just the first costume lol with my time dwindling, i took the easy way out for lightning's dissidia costume. i borrowed my sister's ripped jeans from forever 21 and altered a black top (same one i got the belt buckle from) into a cropped vest. i made a separate from piece from the cut-off sleeves and added silver grommets. i used black suede ribbon to finish off the look. the piece was secured to my top at strategic points with a little thread/safety pins. i took an old necklace and taped a piece of silver-painted craft foam to make the right necklace. for the boots, i attached black-painted leather vinyl to silver square buckles with safety pins. overall, it looked pretty good >.<
Serah
the common stuff
I was super happy to be able to utilize the same character for two days, because that meant I only needed one wig and one color of contacts. Yay! This is partially why I spammed making the second costume and took a lot of short cuts, just to have a second costume, but oh well. This is our first con where we actually wore two costumes!
Wig - I purchased the pre-styled wig from fashiongarden3000 on eBay. Unfortunately, the listing has now ended, so future Serah cosplayers, you'll have to look elsewhere. I will vouch for this seller, though; the wig came in good condition, well-styled, and the wig material was decent. Plus, it's cheap and has free shipping! What more could you ask for? We decided to go with pre-styled wigs this time, because at least for me, I realized I cannot for the life of me style wigs correctly.
Contacts - The contacts came again from KoreaBigEyes. Again, love their contacts, but again, had to double-up on contacts in order to see. Not recommended. Please see our previous review of KoreaBigEyes contacts here... although we should probably make a new one, because that post is pretty terse...

Earrings - I made the earrings out of UltraLite oven bake clay, based on this picture. I used aluminum foil as a workstation liner to keep my table clean, and it also has the added benefit of being bake-able so I didn't have to transfer the pre-baked earrings, an Exacto knife to carve out the shape, and pins to make the holes for the circle parts. I bought earring backs from Joann's and just glued them on with super glue. For the gems, I used flat-backed rhinestones. If you're into nail art, you can get a bunch of rhinestones for pretty cheap on Amazon.


They were very light and easy to wear, and after baking, they were solid. I didn't worry much about damaging them, except possibly on the airplane. The only problem is that they turned out too big, because it's really hard to work with something that small. (See this reference picture.)
Necklace - The necklace was probably my most dreaded part of the entire costume, maybe second to the earrings. It actually wasn't too bad (Serah's shirt was worse), and I followed this nifty tutorial. Again, I used oven-bake clay, and then a combination of jewelry circles, fish wire, thread, and super glue to connect it all together. For the screw-looking part, I used another jewelry-making item that looks like a long thin rod with a loop at the top, and then just stuck it into the main center of the screw. I purchased a shiny clear gem for the center.


I ended up having to shave off the back in order to keep it from looking really weird on me, since the roundness of it made it protrude like a tuber from my collarbone. The necklace also ended up too big, because of my inability to size proportionally. For the ring, I just used a ring I happened to have that for some reason happens to look like an engagement ring...
For both the necklace and earrings, I used silver acrylic paint. It doesn't rub off, and it looks pretty nice.
costume from FFXIII
This costume is deceptive, because it takes longer to make than you (I) would think. It looks like a pretty simple school-girl outfit, but it's got enough twists to make it not as straightforward. Or maybe it's just because I'm too lazy to use patterns properly and can't measure or cut properly.
Shirt - The shirt was probably the hardest part for me because of all the weird shapes. In the end, it didn't turn out quite as well as I'd hoped, but I think that's also in part because I'm just not as thin and long as Serah.
The main part of the shirt was made out of a white, linen-like material. It's actually the same material as the one I used for Aerith's dress. Since it was a bit see-through, I had to do double layers, which made it harder to work with. I just folded the material over to make the edging on the shirt, but I got too lazy to sew up the raw edges of the arm holes :P The translucent part was a soft, sheer white material (I really need to start looking at the material names), with white thread hem as the edging.
As usual, I copped out of button holes by putting in a side zipper. My justification this time was that with those zig zags, the shirt probably wouldn't hold together that well with real buttons. The buttons were black round plastic ones with four holes to make the white cross stitch in the middle. The collar was the same linen material as the rest of the shirt, but since it looks like a single layer in the pictures, I made it stand up with stiffening spray (instead of interfacing).
Again, no real pattern. I cut something rough (really, super rough) based on a vaguely similar shirt I had, then followed a sophisticated method of alternately putting it on, sketching on the material a guesstimate of where to cut or sew, attempting to cut or sew, and then repeating as necessary.


Jacket - The jacket was made of the same sheer material as the translucent part of the shirt, but in a light pink. This was probably the easiest part, though the material was a little difficult to work with. I used light pink thread (the one I used for Aerith's dress) to hem and sew the edges. I used the same "pattern" method as the shirt. I added semi-button holes for the three back ribbons (I actually had to sew the raw edges of the holes by hand, because I still don't know how to make button holes on the machine). The pink bows were made of exactly the same pink material as Aerith's dress, cut in strips, because I discovered that pink ribbon is actually too stiff to make for the bows on this jacket.


Skirt - I found the most closest to perfectist fabric for the skirt at Hancock Fabrics. Many Serah skirts you see are red plaid with some black lines, but Serah's is actually all red and white. I was really happy to find the fabric. To make the outside layer, I modeled it after some school girl skirts I have.
There are three basic parts to the skirt: the base outside layer, the waistband, and the lace (optionally on an inside lining). The outside base was just two large rectangles that I pleated and then sewed together to make the front and back. Note that the center pleat is slightly wider than the two side pleats. The waistband was four pieces of a slightly arced rectangle, two for the inside and outside of the front and two for the inside and outside of the back, with interfacing sandwiched in the middle.

I decided to line the inside with black, because I was planning to wear shorts underneath and didn't want the skirt fabric to catch on the shorts (a common problem for me). In retrospect, the lining should have been pleated as well, as the lace part is actually pleated (and the lining came out a little short, so I had to snip the sides). I tucked the top of the lining into the waistband so it would stay together. I put a short (4") red zipper on the side, with a white hook and eye clasp at the top.


The two gold buttons in the front were made out of the same clay as the necklace and earrings, painted with gold acrylic. The lighter gold was one coat, and the darker gold several coats of the paint. To secure to the skirt, I added eight total button holes each, two at each point if you draw an x across the button, between the dark and lighter golds. The chain-looking thing was just gold lacy ribbon stuff sold by the yard at Joann's.

Shoes - Shoes are always the bane of my every costume. I searched high and low for the right shoes, but it turns out that Converse doesn't even offer high-tops in anything vaguely similar to tan. I was originally going to just dye the shoes, but I wasn't sure what to do with that ugly Converse brand on the side. When my mom found me some blue high tops on sale, I decided to just cover it by sewing tan colored cloth on.
It's actually harder than it sounds (or sounded to me), and I stabbed myself with the needle a ton of times. If you ever want to sew a cover on your shoes, I also highly recommend a pair of small pliers, because it's hard to pull the needle out of the fabric.
I used a light tan canvas cotton and just cut a rectangle, then pinned it on the shoe and worked around. I had two pieces per shoe (one for the tongue, one for the rest of the shoe) and stitched along the edges (near the white plastic part, on the top, and around the shoe lace holes). I made the shoes taller by adding a layer of interfacing to both the tongue and the outside of the shoe. I already had black laces, so I just added those on at the end.

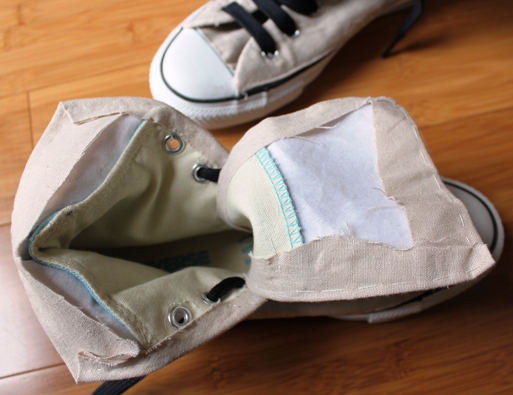


I actually haven't worn these since the convention, because they're kind of fragile, and yet I did so much work to sew the tan on that I don't want to take it off. My dilemma has resulted in the shoes not being worn :(
Accessories - These were kind of fun and kind of not fun. I've probably mentioned how bad I am with crafts many times already, so I was nervous about these. From the top to bottom, there was the armband, bracelet, and then silver leg bands.

The armband was pretty fun. I used the same brown furniture pleather/leather as the sleeve belts on Aerith's jacket (I'm kind of impressed how much I reused from that costume) and followed this tutorial to make the criss-cross pattern. I used metal claspy button things as the two silver buttons, and I had a lot of fun with these because I got to use a hammer! I alternated the top and bottom of the buttons on each side (see picture) so that it would follow the criss-cross pattern when I buttoned it up.

The bracelet was kind of hard to get materials for. I ended up using black leather string, random jewelry pieces for the clasp, and then a combination of bead packages for the gems. I got all of these via many trips to Joann's, scouting out beads and puzzling over the maze-like jewelry section.


The diamond shield(?) thing on her leg was made out of the same clay as the other jewelry. I first made the silver part on the outside (clay + silver paint), then made the inside diamond, and then glued them together. I had a very high tech clasp consisting of hot glue, super glue, and bobby pins to keep the diamond to the thigh band.


costume from FFXIII-2 (DLC)
Shirt - This shirt was actually pretty fun to make. I started out with the same dress shirt pattern I've used for all of my costumes (Rachel's jacket and shirt, Aerith's jacket), and then added length, plus all the extra cut outs. For a while it actually looked like it would make a really pretty black dress, so I almost didn't want to finish it :P Obviously, I still did. The gold edging at the collar was side-stitched gold thread. The gold pieces on the tail were cut out of a gold-colored material, and the edging on that was the same as the one on the shirt collar. The silver buttons were actually plain black buttons that I bought at Walmart and then painted silver (it's surprisingly difficult to find plain silver buttons that don't have that hook that sticks out and makes them protrude from the shirt). The silver lining on the arm holes and front is actually just silver duct tape, because I got lazy and sewing silver material on there wasn't working out. Hey, it worked. I probably can't wash the shirt now, though.


Again, the shirt was a zip up. On the shoulder lines, I added three clasp buttons on each side to attach the fake shoulder armor pad things (see accessories).
Shorts - I decided to buy shorts, because they're way too hard to properly make. For some reason, it's also really hard to find plain shorts. Eventually I found some, and had to cut them to make them proportionally the correct length. It was the first time I ever cut shorts, and since I usually make fun of girls that do that, it felt really weird, haha. I did stitch up the pockets so they wouldn't stick out the bottom, though. For the brown/maroon edging on the shorts, I just sewed on brown ribbon and then glued rhinestones on the front side. I didn't do the back, since it was going to be covered by the shirt anyways.

Shoes - I wore these white boots that I got from milanoo a long time ago. They're actually lolita boots and don't look anything like the actual ones, but I think they were fine for the costume. Also, I was too crunched for time to care about making boot covers :P
Accessories - There are a lot more accessories on this costume than the other one, so it was kind of a pain. The first was the (useless) little shield thing on her arm, which I made out of the same clay as the other parts. I made a flat circle, then pushed up and out the edges to make the front outside ring. I added two cross-wise strips and propped them up with aluminum foil balls. The center circle was another thin ring, like the strips. The center piece of the shield was just a small semi-sphere. I painted the gold parts with the gold acrylic, and then glued blue cellophane on for the blue parts of the shield. It worked out okay, but it wasn't very secure, so I had to be careful not to bump it. I glued two pieces of elastic to the back to put it on my arm (one of them fell off during the convention).


For the belt, I used a white studded belt I had lying around (it's supposed to be brown, but oh well). The gloves that Tiffy referred to earlier for her Lightning costume are the same gloves in Serah's DLC costume. We both tried (and horribly failed) to make gloves, so in the end Jordan managed to find some for me at the costume store, but they turned out to be too small so we had to dissect it to make it fit. I think they still turned out pretty well, though. The gold knuckle pieces were made by Tiffy.
The shoulder armor/pads were made out of a combination of cardstock for the top flat part and laundry fluff for the bottom pad part, wrapped up into white linen (the same as Serah's shirt). I bought golden tassel ribbon from Joann's for the gold tassels.


The leg bag was made out of the same vinyl material as the silver leg bands from day 1's costume, but in maroon. I sort of made up what it was supposed to look like. I used the same button clasps as the armband, and it was again really fun to hammer them on. The other sparkly pieces were again rhinestone. It's kind of hard to describe how I made the leg bag and attached parts, so hopefully the pictures help. The two wide bands were strung behind the bag, and then the top button on the bag clipped onto the top leg band.


Next time...


well, had a wonderful time at AX! and my costumes worked out pretty well. i think christine and i made a nice duo (her costume looked great!) but i will definitely work harder next time so my costumes are better quality. as of now, we don't have an anime convention destination for next year, but i think i know the costumes i want to do. we have enough for repeats now but i definitely want to make lightning's FFXIII-2 armor/feather skirt outfit (recycle wigs!), yoko rittner from gurren lagann (bc i'm chibi haha), and either grell or ranmao from kuroshitsuji. oh and make lightning's sword...lol
It's always fun to cosplay with Tiffy :) I think her costumes (and characters) attract more attention than mine, so I get to tag along for the pictures XD Next time, I guess I'll be trying to make a corresponding Ciel? I actually have the material already, but... we'll see, haha. I'm not sure who/what else, but we'll keep you posted!